Method to detect links in ProFID and examples
Document

Figure 1: Complete process of the methodology. Stage: adding the document.
The process starts with adding a new document to ProFID (Figure 1). The fraudulent identity document to profile is illustrated below and it will serve as our document of interest in our example (Figure 2).


Figure 2: Fraudulent identity document (GE_ts1710-034_ts1710-034_P001).
Analysis

Figure 3: Complete process of the methodology. Stage: analysis.
The next step of the process is about analysing the document (Figure 3). In this step, general and specific features of the document are highlighted.
General features
The general features contain the document number, the document category, the type of fraud, the country of the document, the substrate material, the printing processes (background, number, data, picture) and the background fluorescence. The document number is the element that will be used first to detect some links. Then the document category, the type of fraud, the country of the document and the substrate material allow starting the link research in the database using filters. The information about the printings processes and the background fluorescence will take place as elements helping to confirm established links between two documents. The general features of the document of interest (Figure 2) are presented in the table below (Table 1).
| General Characteristics | |
|---|---|
| Document number | 0123563 |
| Document category | Driver's license |
| Country of the document | Iraq |
| Substrate material | Plastic |
| Background fluorescence | Fluorescent |
| Printing process | |
| Background | Inkjet printing |
| Number | Thermal dye sublimation |
| Data | Intaglio printing |
| Picture | Inkjet printing |
Table 1: General features of the document of interest.
Specific features
Three specific features of the document of interest should be chosen, called anchor features. The following criteria serve as a guide in this choice:
- Comparability
- Features should be visual and directly observable on the scan image.
- Availability:
- Features that are persistent or at least with a long lifetime: stable zone that should not change (for example: pre-written data, template, complex elements).
- Complementarity:
- Features that are independent from each other.
For example, the anchor features of the document of interest are presented in the table below (Table 2).
Anchor features
| Number | Anchor features |
|---|---|
| 1 |  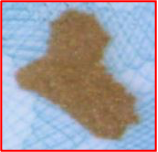 OVI imitation (country shape) |
| 2 |  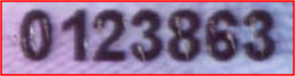 The document number is kind of scratched |
| 3 |  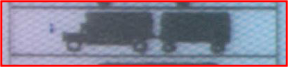 A black dot is observed in front of the truck and has nothing to do here |
Table 2: Anchor features of the document of interest.
Comparison

Figure 4: Complete process of the methodology. Stage: Comparison of the document number.
The comparison process of the document of interest with the content of the ProFID database is made of three successive stages of comparison: comparison of the document number, comparison with the pre-existing series and comparison with all the isolated cases (Figure 4).
The process can interrupt itself after each stage if a link is found.
Comparison of the document number

Figure 5: Complete process of the methodology. Stage: Comparison of the document number.
The first stage of comparison is to verify if another document from ProFID has the same document number as the document of interest (Figure 5). A first indication is visible on the description page of the document in the part "General information about the document" where the document number appears in blue and is followed by a lightning when one or several documents of the same type in the database have a similar document number. Click on "Suggestions" tab on the page of the description of the document of interest (Figure 6). In this case, none of the documents of the database ProFID has the same document number (Figure 6). Therefore, it is necessary to get to the second comparison stage - "Series suggestion" (Figure 7).
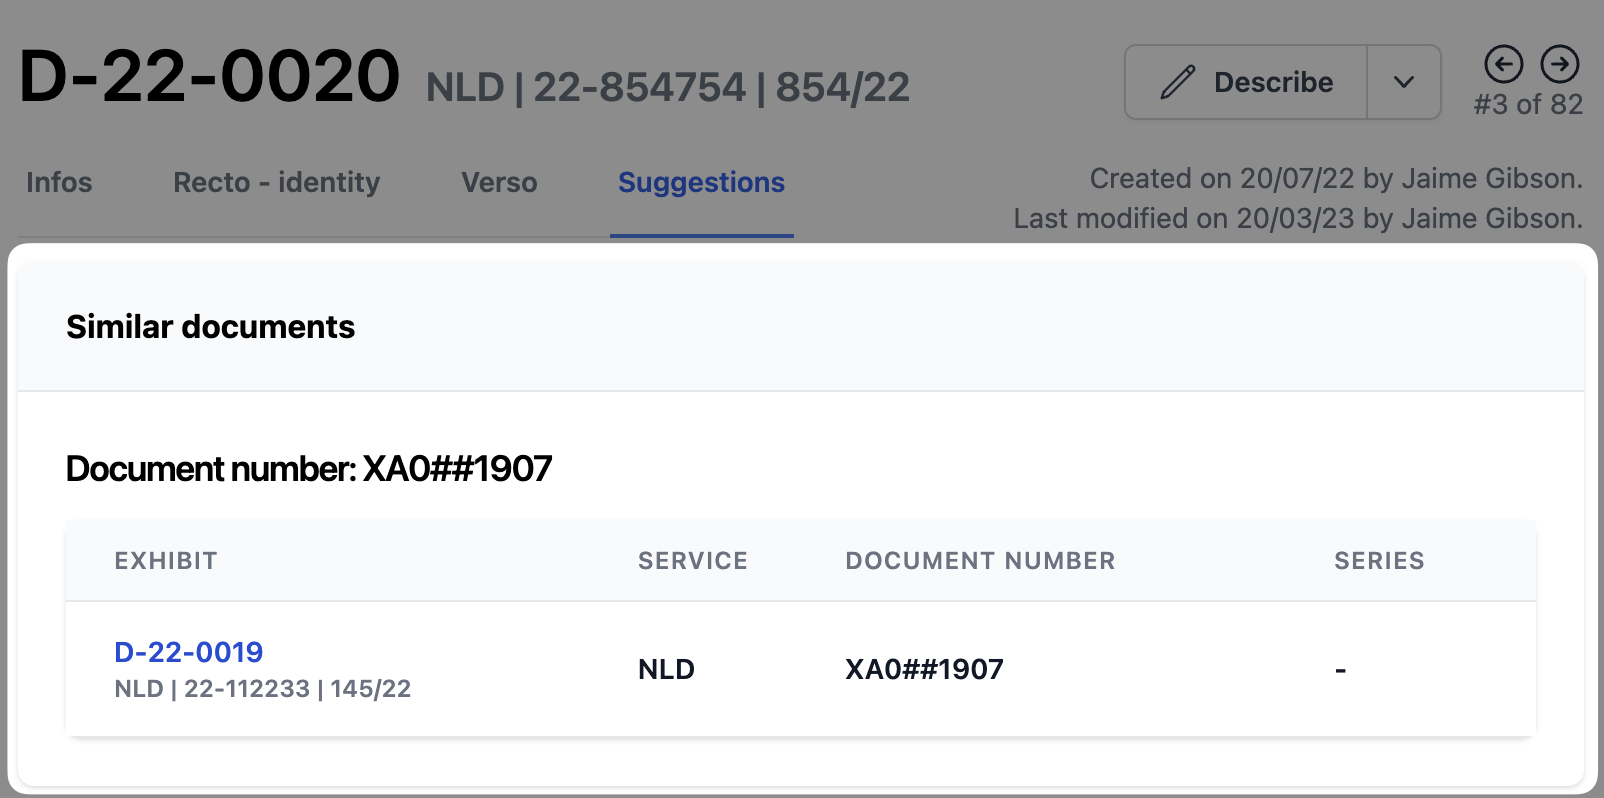
Figure 6: Illustration of the document number comparison.
Comparison with the pre-existing series

Figure 7: Complete process of the methodology. Stage: Comparison with the pre-existing series.
This stage consists in verifying if the document can fit in one of the pre-existing series, i.e. a series that is already documented in ProFID (also known as "series homologous to this document"). These latter are suggested in the tab "Suggestions". Click on the name of the series to directly access their description (Figure 8).
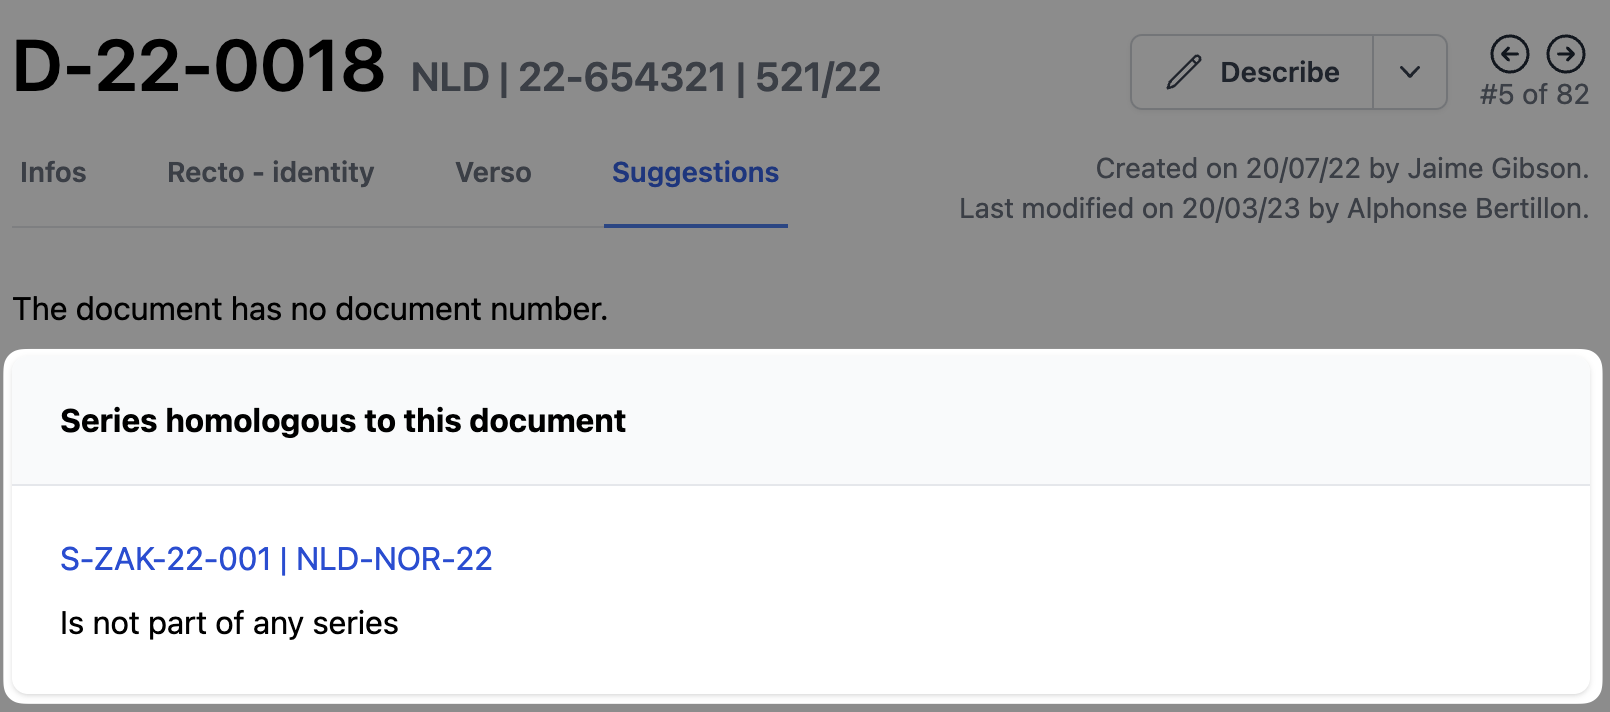
Figure 8: Illustration of the comparison to pre-existing series.
Once the series description is displayed on the screen, it should be easy to see whether or not the anchor features chosen during the analysis stage are present in this series or not (Figure 9). It may be necessary to access to all the documents of the series to verify if the document of interest really belongs to the series. This can be made by clicking on "View all documents" (Figure 9).
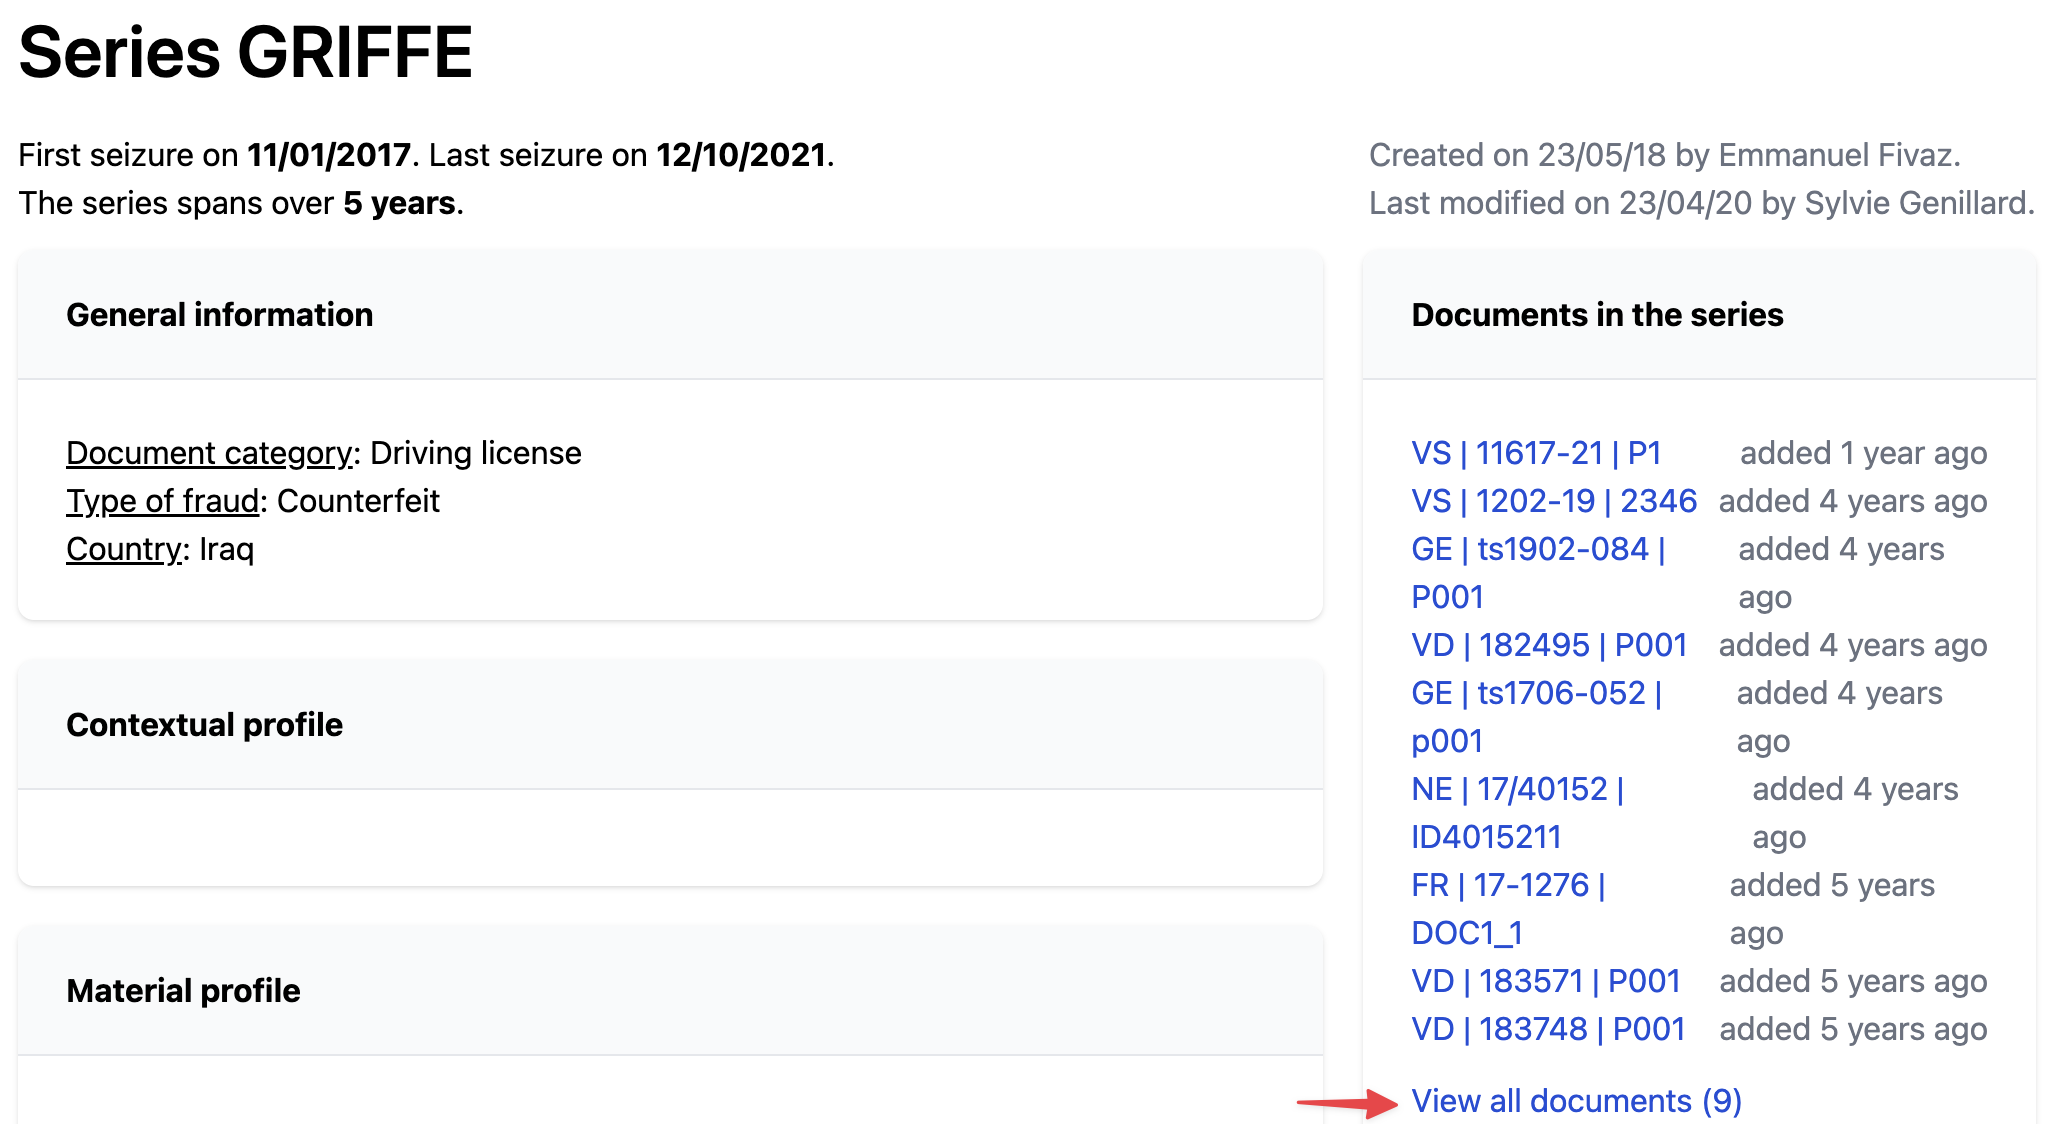
Figure 9: Description of the series named GRIFFE and illustration of the button that provides access to view all documents belonging to the series.
Once the document list is displayed, it is recommended to divide the screen into two parts (see Screen splitting) and to place the document of interest on the left side of the screen and the documents to be compared on the right side (Figure 10). It is possible to scroll through all the documents of the series using the blue arrows or using the right/left arrows of your keyboard. Back and forth comparisons between the document of interest and the documents to be compared allow to make sure of the established link in terms of visual and/or physical features. Moreover, the printing processes as well as the background fluorescence should be taken into account and it should be checked whether further features match.
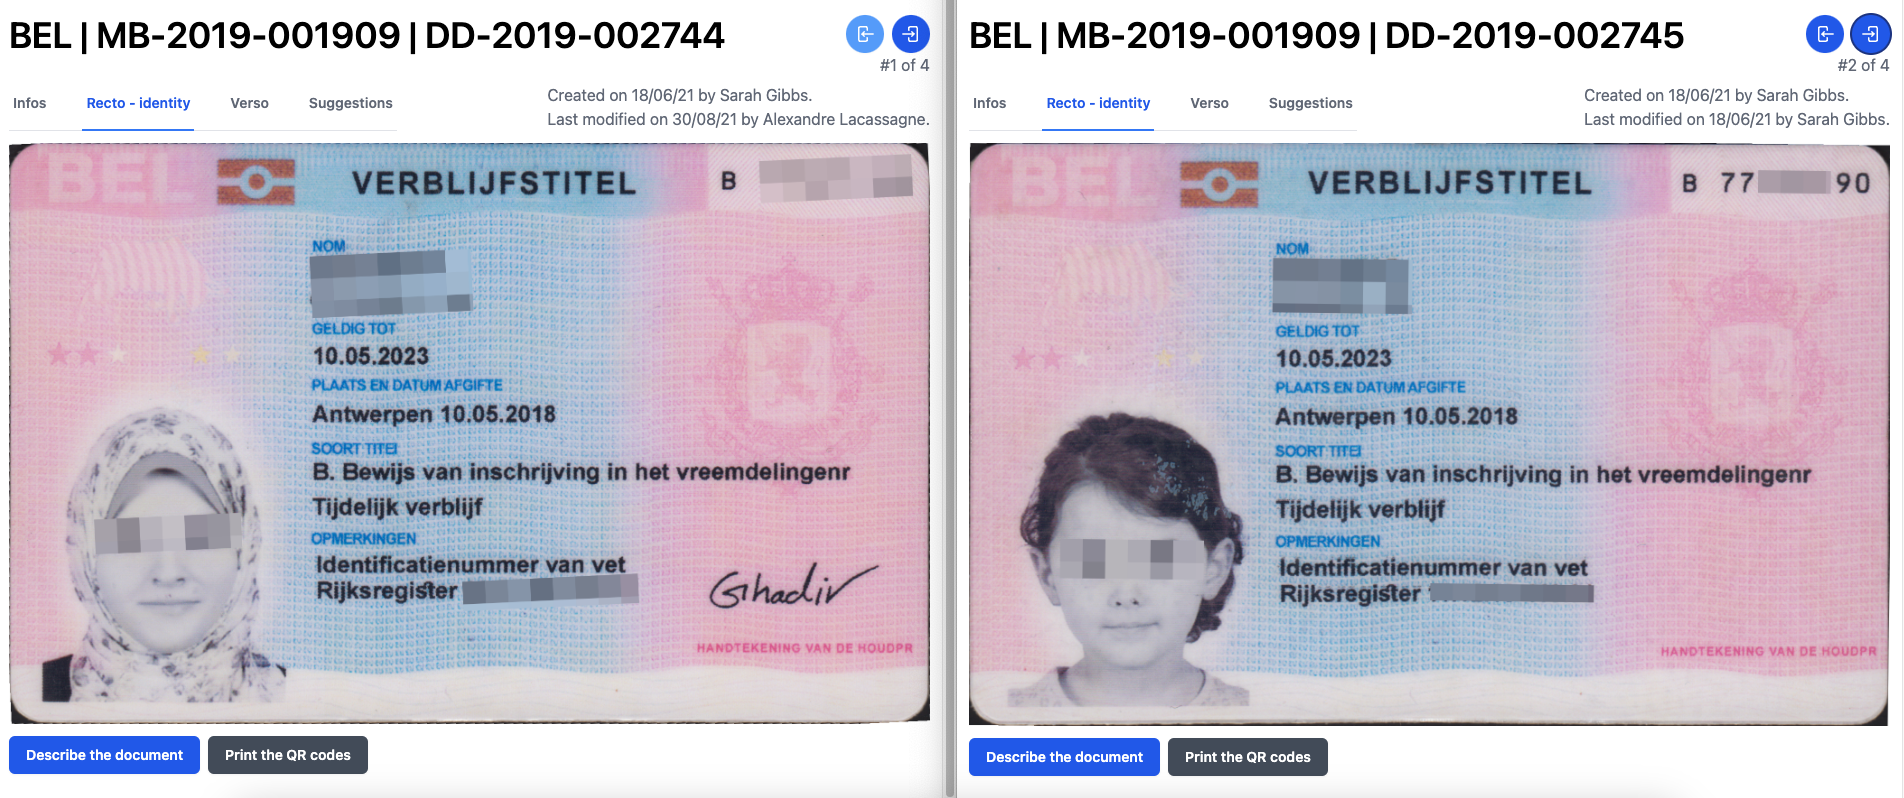
Figure 10: Illustration of screen splitting with the document of interest on the left side and the documents that need to be compared on the right.
Once the link is established and confirmed, the document of interest can be added to the series (Figure 11). Simply go the "Infos" tab on the page of the document of interest and click on "Describe the document", then add it to the series. Within the part "Information about the case", a drop-down list enables to select the series which is the document is belonging to (See About series).

Figure 11: Complete process of the methodology. Stage: Comparison of suggested series - Addition to the series.
In this example, the document can be added to the series named "GRIFFE". It is recommended to fill and complete the series description and/or to modify it depending on the evolution of the features highlighted, this in order to make easier the detection by other users.
Comparison with isolated cases
In the case where no link has been made with the pre-existing series, the next step is to look for links with some documents that are not associated to a series, which can be considered as isolated cases (Figure 12). There are two ways to do this:

Figure 12: Complete process of methodology. Stage: Comparison with isolated cases.
Starting from all documents
Select the "Documents" menu and then "Documents list" (Figure 13). All the documents registered in the database will appear, whether they belong to a series or not. For this reason, filters need to be applied before proceeding to the comparison of isolated cases. To filter the database, click on the blue icon that allows accessing to the filtering options and select the different filters corresponding to the document of interest in terms of document category, type of fraud, country of the document and material of the support (Figure 13). Then exclude all the existing series to avoid making a comparison that already has been made in a previous step. To do this, click on the filter "series" and select "No Series" which will only select the documents that are not linked to a series (Figure 13).
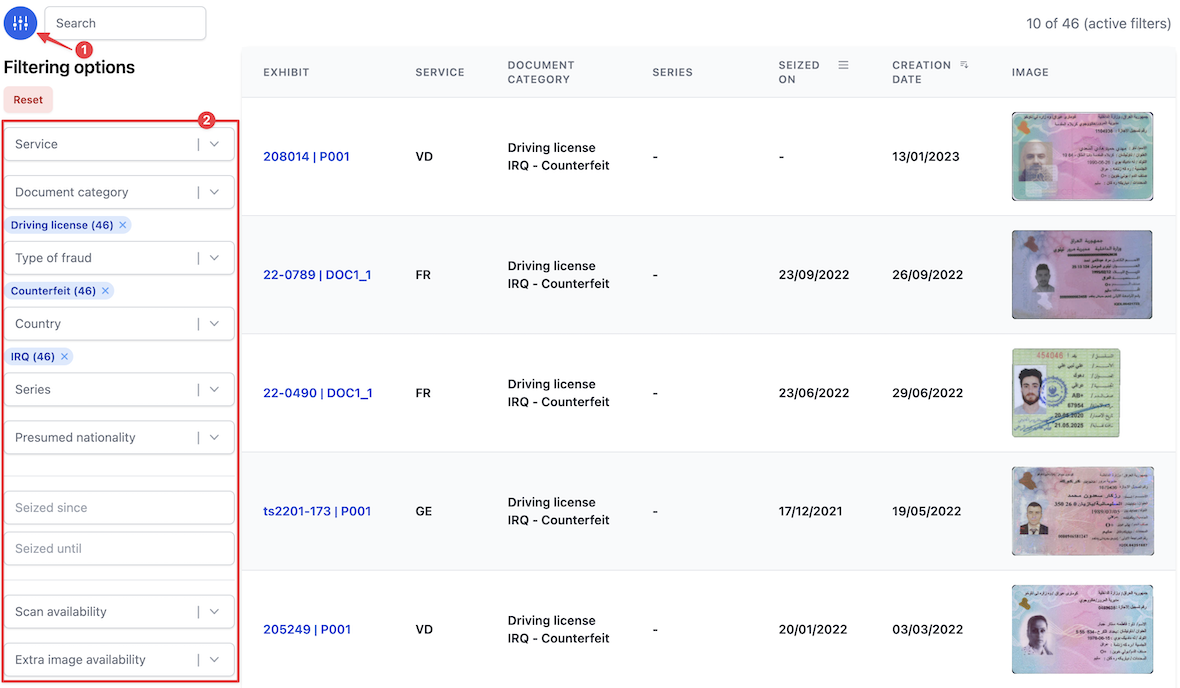
Figure 13: Illustration of the action that allows to access to all the documents and to the filters.
Starting from the document of interest
On the description page of the document, click on the "Magnifying glass" button that is to be found in the part of "Document analysis". One can then select research criteria that will found matching documents. Several research criteria are proposed and can be combined as needed. To be efficient in your search while also minimizing the risk of missing similar documents, it is suggested to start with the following search criteria: document category, type of fraud, country of the document and material of the support (Figure 14). The system will provide you with the list of the documents that the selected criteria. This list should be filtered with "No series" in the "Series" filter in order to avoid to compare documents that have already been compared.
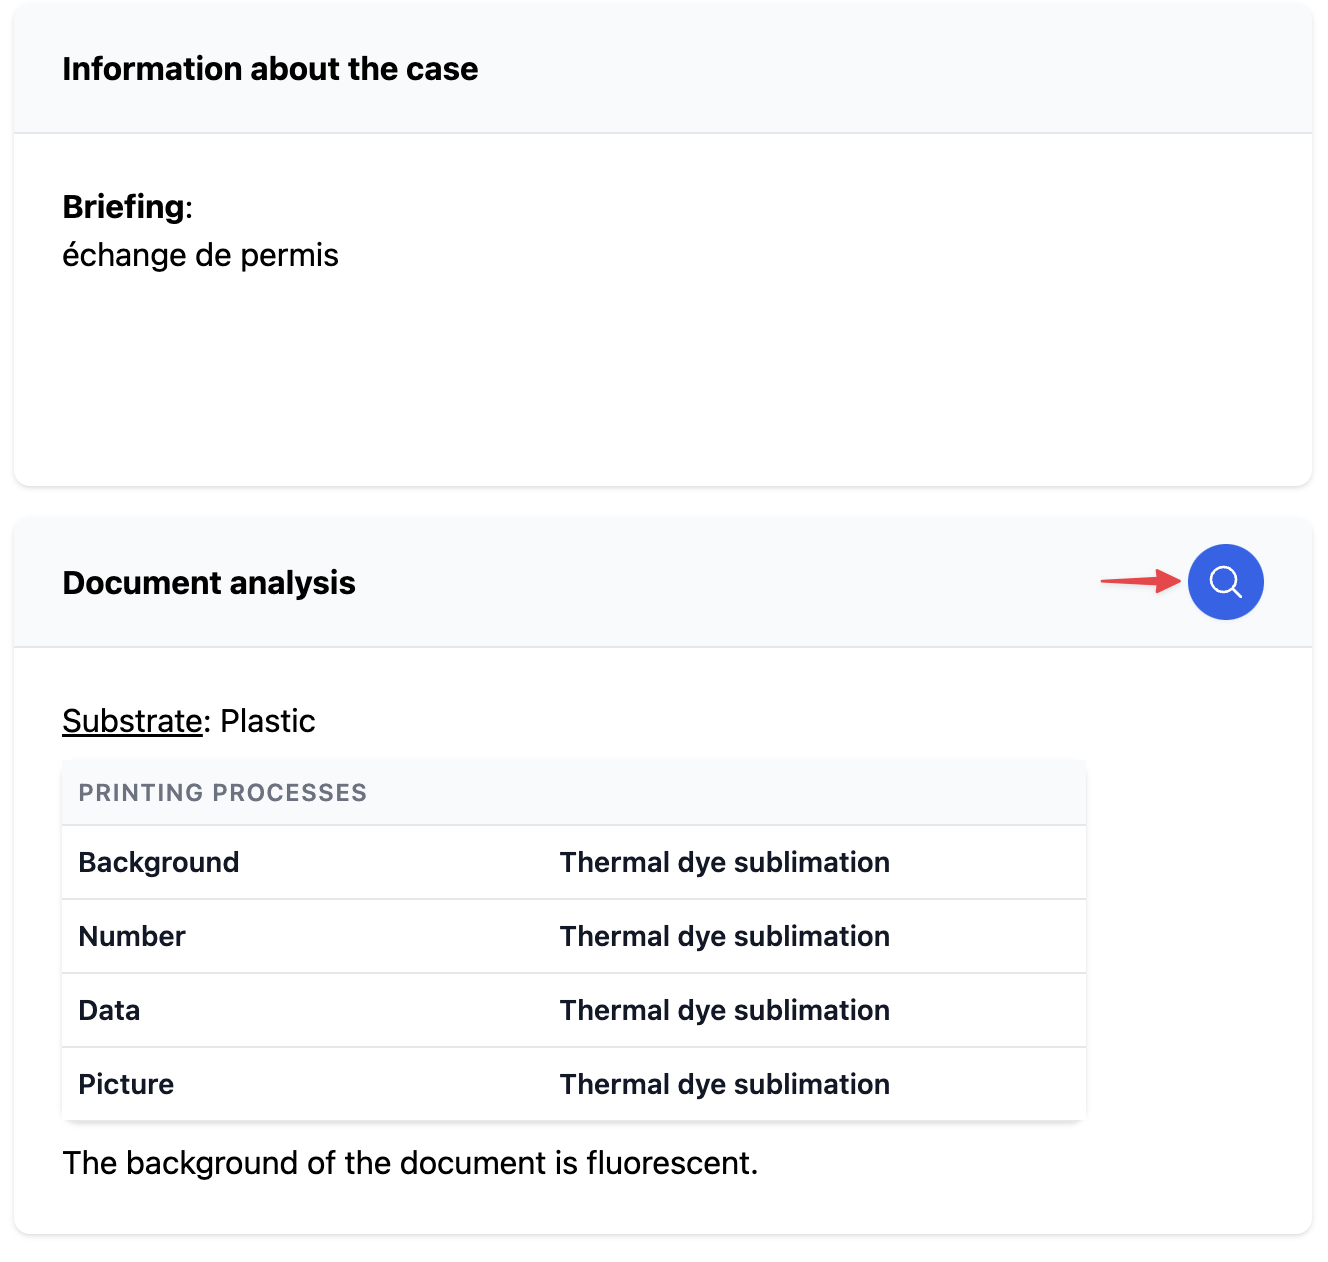
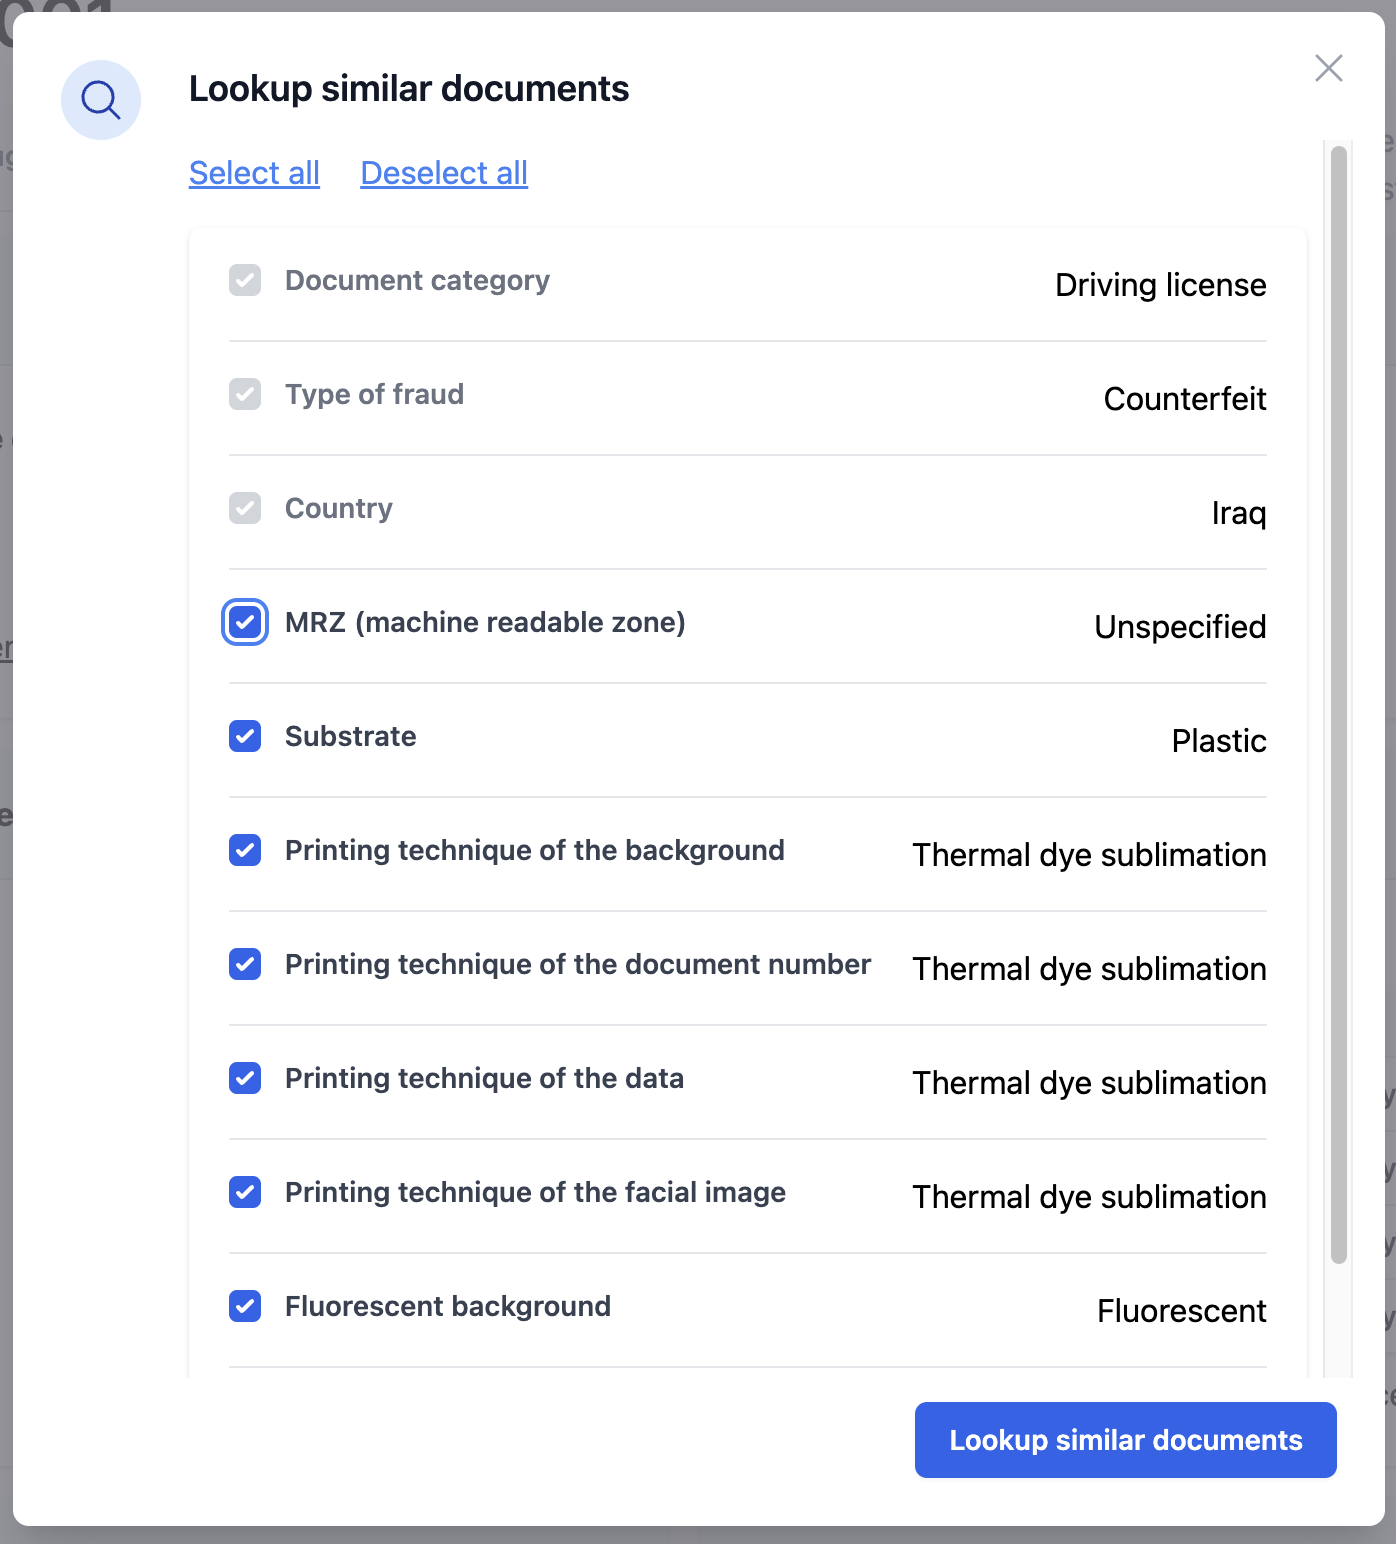
Figure 14 and 15: Illustration of how to process with research criteria to find similar documents.
In the present case, four documents meet these criteria and are therefore isolated cases. It is necessary to compare them all with the document of interest as explained in the point "b. Comparison with the pre-existing series". At this stage, there are two possibilities (Figure 16). If some links have been made with a document, it will be necessary to create a new series. In the case where no link has been established, simply indicate that the document in question has been profiled by selecting the "Forensic profiling" box accessible via the "Describe the document" link.

Figure 16: Complete process of methodology. Stage: Comparison with isolated cases - create a new series or tick "forensic profiling"